- Index page with recent astrophotos
- Leeuwenboschfontein weekend starparty 2016 Mar 4-6
- Events observed by me from 2003 latest: Mercury transit 2016 May 9
- Page with sky pictures with the EOS 6
- Lunar and planetary images and phenomenas
- Page with sky pictures with the EOS 40 from Bali jan 2009, feb 2010 and 2012
- Page with sky pictures from La Palma Jan / Feb 2011
- Total lunar eclipse of 2011 Jun 15
- Solar eclipse visible as deep partial in Indonesia on 2009 Jan 26
- Old 1973 Polarex 80mm spotting scope refurbishment.
- New 2015 Robtics ED110 refractor
- Using a telephoto lens as a small handheld telescope
- Nice sky pictures taken from a plane in full flight
- How to see stars in the daytime ?
- Old astrophotos from 1980-1990s
- How I learned Astronomy
- Astronomik CLS filter test
- Simple Eclipse calculations
| This page is particularly for use with non-goto mounts which must be set up for an exact polar alignment even when the celestial pole is not in view. | |
First: Setting up an equatorial mount with a polar scopeMany commercial mounts such as the Vixen Great Polaris, SkyWatcher EQ-3, EQ-5 and EQ-6 have a built-in pole finder with a template in which one can 'fit' the star patterns by rotating the telescope around the RA axis and moving the polar altitude axis and azimuth. Example of the areas within 3° from each pole marked stars are until mv = +6.5 circles are 1 degree declination increments and 1 hr (=15 degrees) RA increments where in the north pole area the RA increases clockwise and on the south pole anticlockwise. Set for Epoch 2014.0. 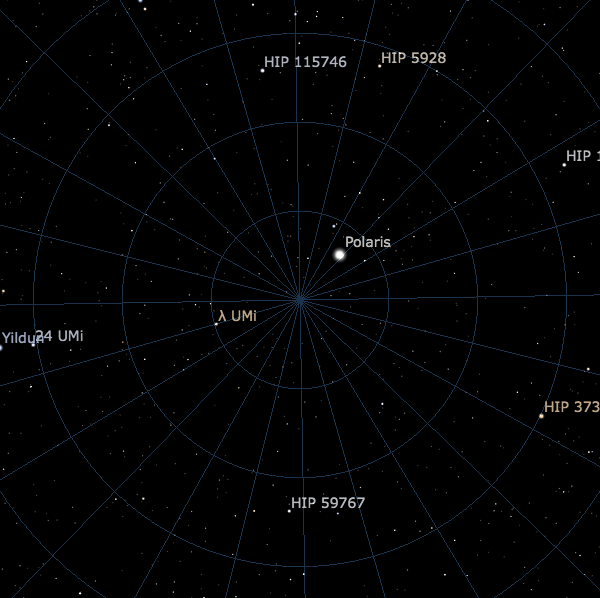 North pole area with RA=0h on top 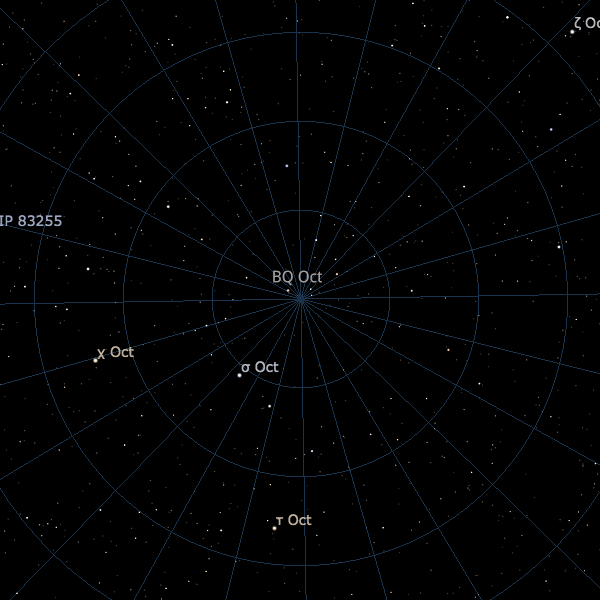 South Pole area with RA=12h on top Note that on the South pole area there is a brighter star (the +6.9 star BQ Octantis, NOT σ Oct !) very close (10') to the Pole (top left of the pole) which can be seen in any polar finder. Around the North Pole no star closer to the pole is visible by a pole finder as the diameter of the small objective is usually no more than 2cm. This makes easier setup possible. | |
Polar alignment of an equatorial mount using level 26 Feb 2014. Polar alignment of an equatorial mount using level 26 Feb 2014. Polar alignment of an equatorial mount using level 26 Feb 2014.
Homemade balcony mount 14 Oct 2011. Homemade balcony mount 14 Oct 2011.
| |
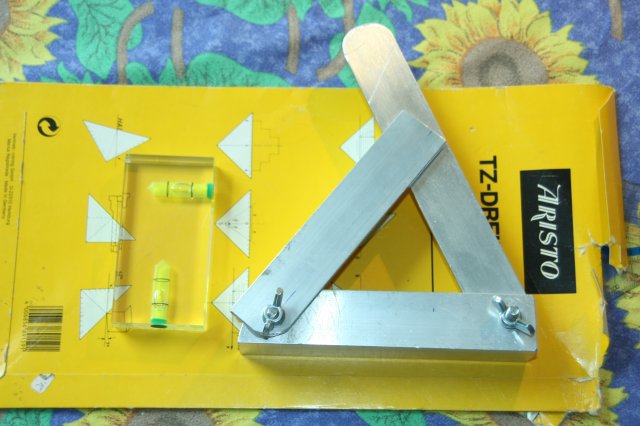
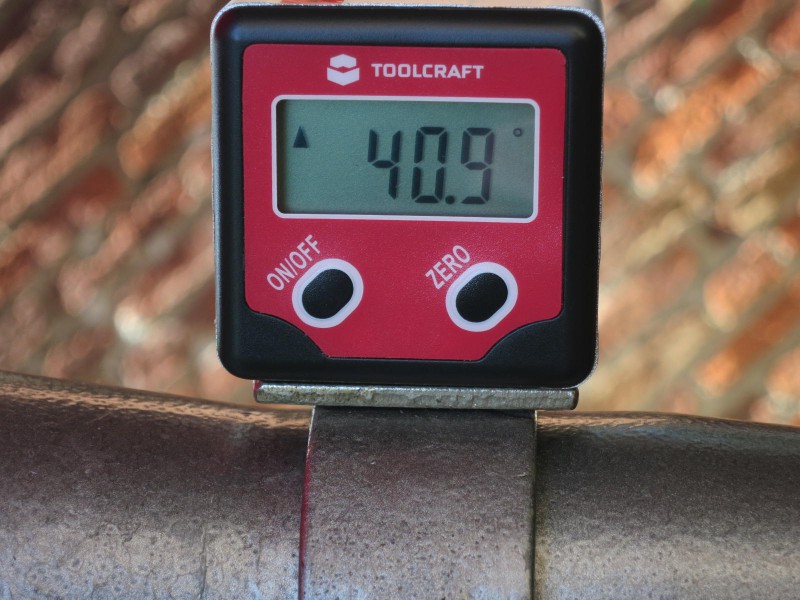
Setting up an equatorial mount with a levelSome people experience difficulties with handling an equatorial mount. However this method is based upon the same principle as the 'two star alignment' of many Goto mounts, using the zenith as one alignment 'star' and another object (can be even the Sun) as alignment stars. This method describes setting up with a simple level mounted on an angled hook which equals the local latitude. I have made an adjustable hook from aluminum strips but you van also make such a level from a piece of wood with two flat (straight) sides which exactly intersect with an angle equal to the local latitude. And alternative can be an electronic inclinometer e.g. the one from Toolcraft which measures vertical angles to 0.1 degree accuracy. Note: smartphone (Android / iOS) inclinometer apps are not accurate enough, usually they don't even get 1 degree accuracy which is inefficient.The benefit of this method is:
During night you need a red flashlight, the best is a headlight as you have your hands free.
The procedure I describe here is for a Vixen Super Polaris mount, but most, particulary transportable EQ mounts work similar. Requirements:
1 Set up the tripod and tighten the tripod screws firmly. It is not necessary to set the tripod exactly level, only roughly level suffices. As long as the RA axis points to the celestal pole as accurate as possible, then the mount is adjusted. The polar axis should be pointed as closely to true north (or south in the southern hemisphere) as possible. Have ready the positions of two bright objects. In the daytime this can be the Sun ![[!]](danger.gif) (and Moon or Venus if possible). Note the local sidereal time changes by time (23:56 hours a day which means during the 5-10 minutes of alignment one minute for each minute of time).!! Use a low power eyepiece with a true FOV of at least 1 degree, for a 10 cm 25-40x is OK. It should be exactly focused. (and Moon or Venus if possible). Note the local sidereal time changes by time (23:56 hours a day which means during the 5-10 minutes of alignment one minute for each minute of time).!! Use a low power eyepiece with a true FOV of at least 1 degree, for a 10 cm 25-40x is OK. It should be exactly focused.When the Sun is involved for alignment, have a cardboard aperture of 5 cm ready to stop off the objective to prevent overheating the star diagonal or eyepiece and DO NOT LOOK INTO THE EYEPIECE !!!. 2 Point the polar axis to roughly north (or south) within 15 degrees. Slightly unscrew the knob under the mount which connects the mount on the tripod and loosen the horizontal adjustment screws as far as possible. Loosen the lock screw of the polar altitude as well. 3Hold the wedge+level (or the inclinometer) on the tube of the polar axis and set the angle of the polar axis equal the current latitude with the altitude fine tune lever. When the altitude is correct (as seen the 34 degrees example in the video) tighten the lock screw of the vertical (latitude) adjustment again. 4 Now we use the zenith as the first alignment point. Point the scope to the zenith and check with a level in two directions along the tube or with a bidirectional level on top of the scope so the scope is exactly pointed vertically (fig 5). Lock both axes. Then adjust the declination circle to your latitude.
5
Adjust the RA setting circle zero hours. 6 Adjust the horizontal azimuth until the bright object is in the scope field. When the azimuth is far (> 10 degrees) off the real azimuth of the pole which means the polar axis azimuth is not true north/south) check the polar axis altitude as described in step [2] when the tripod is not level. And then go to step [5]. Otherwise, continue. Optionally, you can use another star at least 60° apart from the first star to make a better alignment, by repeating this step for the other star.
7
(daylight only and when you use the Sun als the first alignment object) For further adjusting (e.g. long exposure astrophotography) you can use the drift method | |